
Table of Contents
If you mill your own lumber, air drying (letting lumber dry slowly outdoors in a stacked pile) gets you most of the way to usable wood, but it has a ceiling. A DIY lumber kiln closes the gap between air-dried lumber sitting at 15 to 20 percent moisture content (how much water is in the wood, as a percent of its dry weight) and the 6 to 8 percent interior furniture wood needs. You do not need a commercial kiln to get there. A well-built solar kiln or a home-built dehumidification kiln, run correctly, will finish lumber that has already been air-dried down to a reasonable starting point.
What a DIY Lumber Kiln Does
A kiln does not replace air drying. It finishes it. Green lumber loses moisture fastest in the first few months of air drying, then the rate slows as the wood approaches the surrounding air's humidity, called equilibrium moisture content.
In most climates, that equilibrium sits somewhere around 12 to 15 percent, which is too wet for furniture, flooring, or anything that will live indoors. A kiln forces the last stretch of moisture out under controlled heat and airflow, and a hot enough cycle also kills any insects or fungus living in the wood. Our guide to powder post beetles in lumber covers the temperatures that do it. Skipping the air-drying stage and loading green lumber straight into a small DIY kiln is a common mistake. It dries unevenly, cracks more, and takes far longer than starting from air-dried stock.
Solar Kiln or Dehumidification Kiln: Which One to Build
The two DIY approaches work differently and suit different situations. A solar kiln is a passive, glazed box that uses sunlight to heat air and drive off moisture, venting it outside. A dehumidification kiln is an insulated, sealed box with a commercial dehumidifier that removes moisture mechanically. Neither is strictly better. They solve different problems.
| Factor | Solar Kiln | Dehumidification Kiln |
|---|---|---|
| Power source | Sunlight, plus small fans | Electricity (dehumidifier, heater, fans) |
| Weather dependence | High, slows in cloudy or cold weather | Low, works year-round indoors or in a shed |
| Typical build cost | Lower, mostly framing and glazing materials | Higher, driven by the dehumidifier unit |
| Typical drying time | Around a month for 1 inch hardwood in sunny weather | Similar or somewhat faster, consistent regardless of season |
| Best for | Sunny climates, seasonal batches, lower upfront cost | Consistent year-round drying, indoor space, colder climates |
Building a Solar Kiln
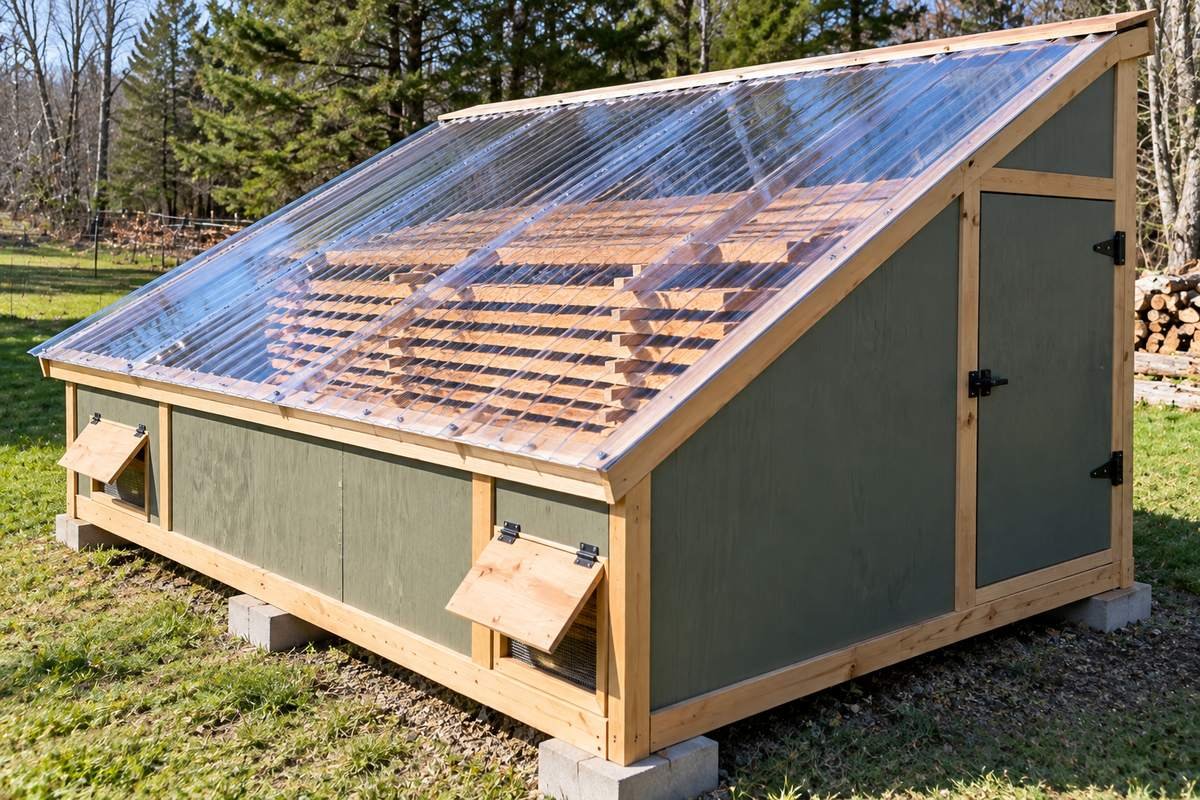
A solar kiln is one of the two common DIY kiln designs. It is an insulated box with one glazed, south-facing side that acts as a solar collector, a dark absorber surface inside to convert sunlight to heat, and fans that push heated air through the stacked lumber.
Sizing and roof angle
Size the kiln to the amount of lumber you produce, not the other way around. One commonly used Virginia Tech Extension design guideline sizes capacity at roughly ten board feet of one-inch lumber for every square foot of collector. So a kiln with a 75 to 100 square foot glazed roof holds in the range of 750 to 1,000 board feet (a lumber volume unit: 12 by 12 by 1 inch) per charge. A full cycle takes about a month in moderately sunny weather.
A separate published Oregon State design uses the same ten-to-one ratio and dries around 450 board feet of one-inch hardwood in six weeks or less, with softwoods finishing in roughly half that time. Either formula gets you in the right range for a backyard build.
Angle the glazed roof to the south at roughly your latitude in degrees, which keeps the collector facing the sun through more of the year.
Glazing and absorber
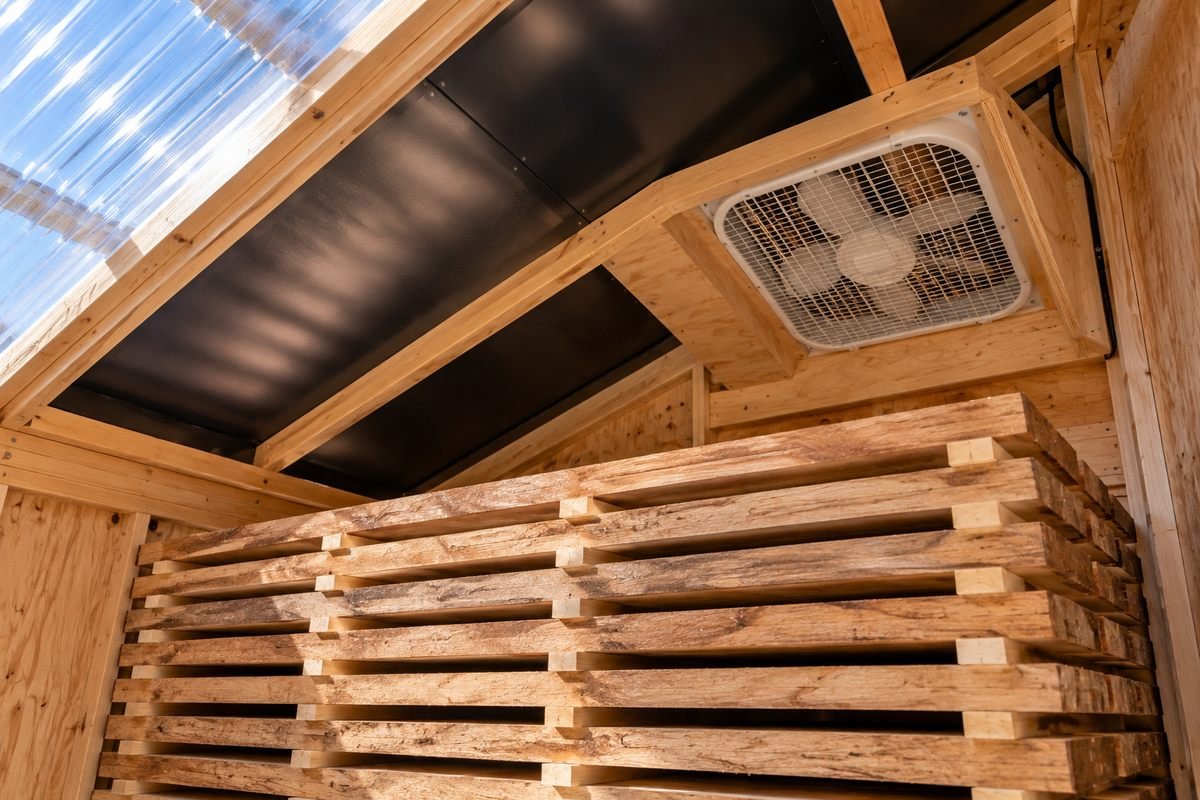
Greenhouse-rated corrugated polycarbonate is a common glazing choice, and a double layer separated by a small air gap improves insulation in colder climates, though a single layer of fiberglass, plastic film, or glass also works. Inside, the absorber, usually a plywood panel, gets painted a flat black to convert sunlight into heat efficiently. Framing is standard construction lumber: 2x6 floor joists on 16- to 24-inch spacing with plywood top and bottom, pressure-treated where the frame touches the ground, and 2x4 stud walls sheathed in plywood.
Fans and vents
Two to three multi-speed fans, mounted near the roof against a plywood baffle, circulate heated air down through the stacked lumber. Metal-bladed window fans hold up better than plastic ones, since an empty solar kiln can exceed 200 degrees Fahrenheit on a clear day, hot enough to warp or melt plastic fan components. Vent openings in the opposite wall, a few one-foot-square openings with simple hinged doors and insect screening, release humid air and let the kiln breathe. Run the fans from mid-morning through evening and shut them off overnight, which relieves drying stress on the wood rather than pushing it around the clock.
Building a Dehumidification Kiln
A dehumidification kiln is the other common DIY kiln design. It trades sunlight for an electric dehumidifier, which makes it cost more to build but far less dependent on the weather.
The insulated box
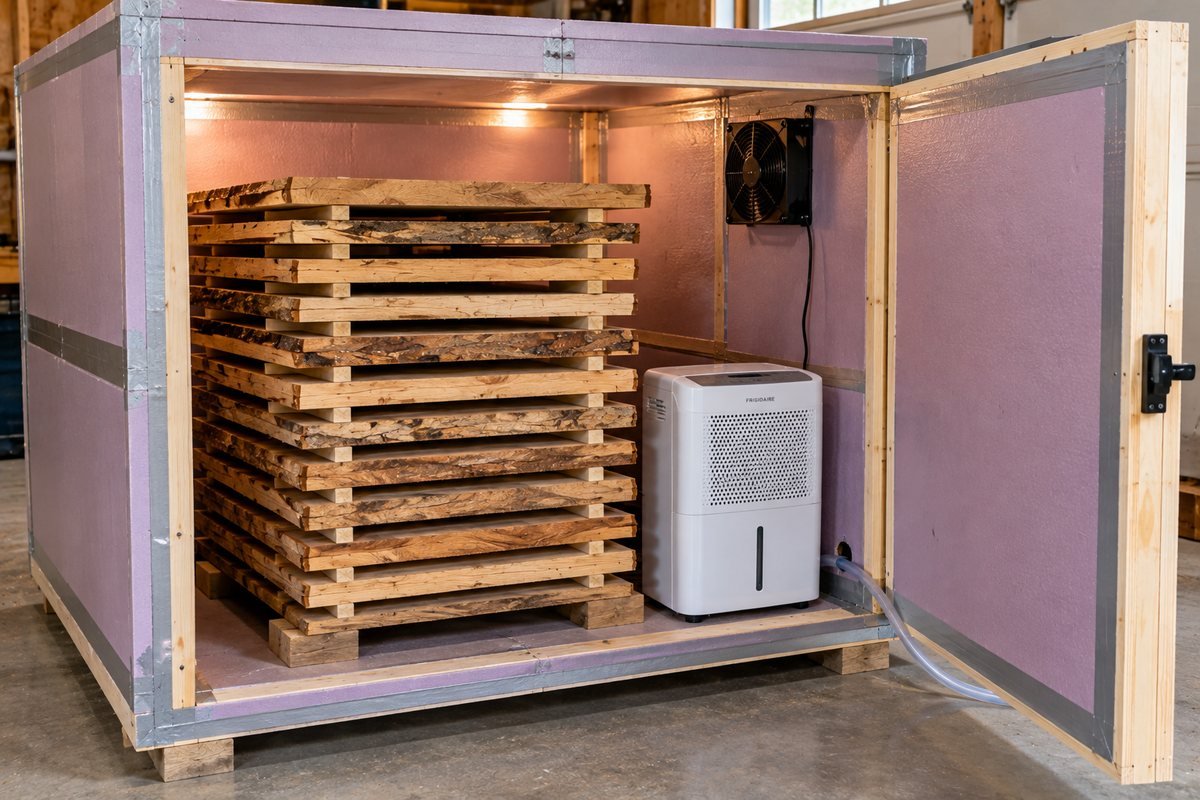
The enclosure needs to hold both heat and humidity, which means real insulation, not just a plywood shed. A common approach uses rigid foam board, commonly around 2 inches thick, with seams taped rather than left open, built into a simple box sized to your stack of lumber. Every seam and door gap that leaks air works against the dehumidifier, so build it as tight as a walk-in cooler.
Dehumidifier and heat cycle
A commercial dehumidification kiln unit built for this purpose typically combines a compressor-based dehumidifier, an auxiliary heater, and circulating fans in one package, sized to the enclosure's volume. Day to day, low-temperature drying happens passively as the dehumidifier pulls moisture out of the circulating air. At the end of a drying cycle, or whenever insect kill is a concern, the kiln needs a short high-temperature hold. Raise the air temperature to around 160 degrees Fahrenheit or hotter until the wood core reaches roughly 135 degrees Fahrenheit for one to two hours. Unplug or bypass the dehumidifier during this heat-kill phase, since dehumidifier units aren't built to run at those temperatures.
Wiring and controls
This is the step where a homemade dehumidification kiln most often goes wrong. Use dedicated, correctly rated circuits, not an extension cord run off a shared outlet, and never bypass a dehumidifier's built-in thermal overload protection to force it to run harder or longer than it was designed for. A seized or overloaded unit left running unattended is a genuine fire risk in an insulated, wood-filled enclosure.
Loading and Running Your Kiln
However you built it, running the kiln correctly matters as much as the build itself. Start with lumber that has already air-dried down into a reasonable range rather than loading green wood straight from the mill. The fastest, riskiest phase of drying is the first third of moisture loss, when the wood is most prone to surface checking (small cracks that open as wood dries) and end splitting. So you need to control the drying rate rather than rush it, even inside a kiln. As a rough guide, one-inch-thick red oak should not lose more than about 3 percent moisture content per day, and other species have their own safe limits.
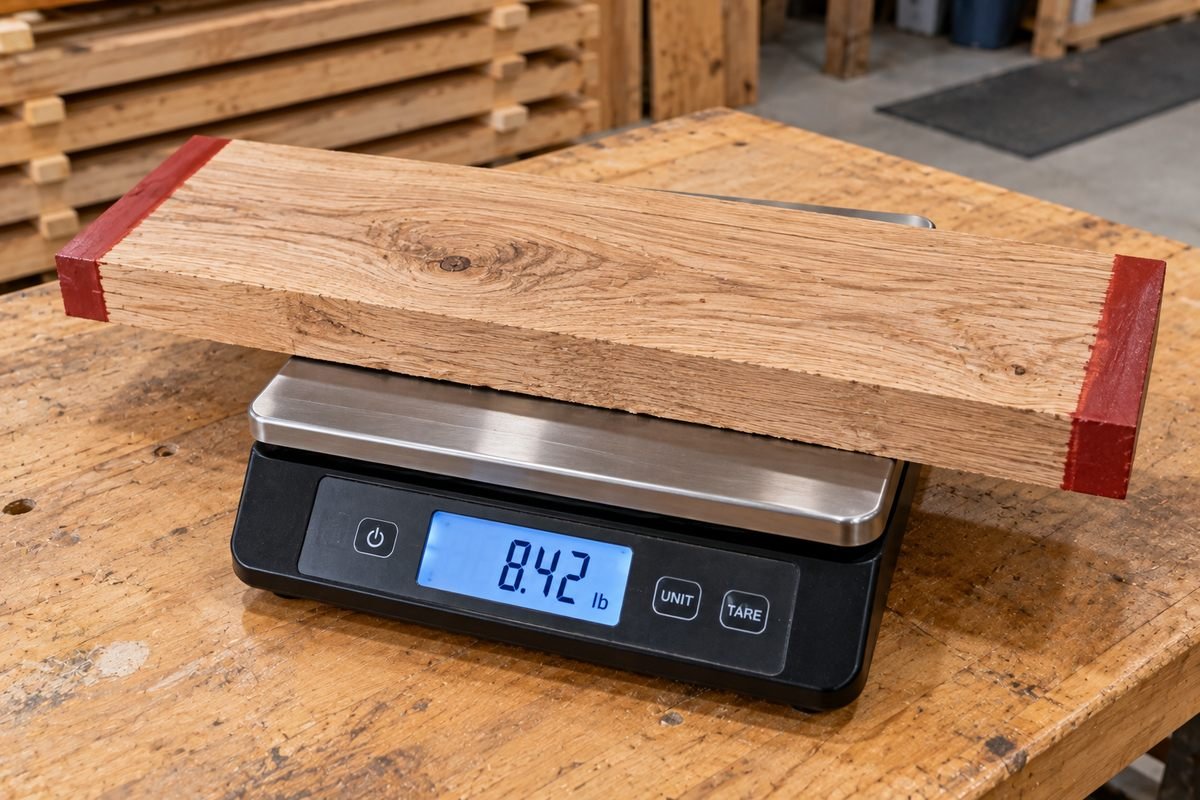
Moisture meters read reliably only below about 30 percent moisture content. Above that, weighing a sample board periodically and tracking weight loss over time is the more reliable way to monitor progress (our guide to moisture meters for wood covers meter selection for the later, lower-moisture stages). Target 6 to 8 percent moisture content for lumber headed indoors, and 12 to 15 percent for anything staying outdoors.
Safety Warnings You Should Not Skip
Both kiln types involve real heat, and a dehumidification kiln adds household electrical wiring inside an insulated, combustible enclosure. Check with your homeowner's insurance to confirm the kiln is covered beyond a strictly personal hobby. A fire that starts in an uninsured backyard structure is a very different insurance claim than one that starts in a garage covered by an existing policy. Wire circuits to code, never bypass a unit's thermal overload protection, keep any heater safely clear of lumber and framing, and add a smoke alarm near the kiln itself, not just inside the house. None of this is optional once real heat and electricity are involved.
Maintenance
Keep up with maintenance. Check fan bearings and belts each season, recaulk or re-tape glazing and insulation seams where UV exposure or moisture has degraded them, and regularly clean dust and wood debris out of a dehumidification kiln's coils and cabinet. Debris buildup is one of the most common causes of an overheating unit. A solar kiln's absorber paint will fade over several seasons and is worth refreshing to maintain collector efficiency.
Frequently Asked Questions
How long does it take to dry lumber in a DIY kiln?
A solar kiln typically finishes a charge of one inch hardwood in about a month of moderately sunny weather, with softwoods finishing in roughly half that time. A dehumidification kiln runs on a similar or faster timeline and doesn't depend on the weather, so it stays consistent through winter and cloudy stretches. Both numbers assume the lumber was already air-dried down to a reasonable starting point before it went into the kiln.
Do I need to air dry lumber before kiln drying it?
Yes. Loading green lumber straight from the mill into a small DIY kiln causes uneven drying and a higher rate of cracking and surface checking. It also takes far longer than starting from lumber that has already air-dried down to the 20 to 30 percent moisture content range. Treat the kiln as the finishing step, not the whole process.
Is a solar kiln or a dehumidification kiln better for a first build?
A solar kiln is generally the simpler and cheaper first build, since it is mostly framing, glazing, and a couple of fans, with no dehumidifier unit or heavy electrical work involved. A dehumidification kiln costs more upfront and requires careful wiring, but it isn't weather-dependent and works year-round, which matters more in cloudy or cold climates.
What temperature kills insects in a lumber kiln?
Most insect-kill schedules call for holding the air temperature around 160 degrees Fahrenheit or hotter until the wood core reaches about 135 degrees Fahrenheit for one to two hours. In a dehumidification kiln, unplug or bypass the dehumidifier unit during this heat cycle, since it isn't built to run at those temperatures.
How much lumber can a backyard solar kiln hold?
A common sizing guideline is about ten board feet of one-inch lumber per square foot of glazed collector, which puts a kiln with a 75 to 100 square foot roof in the range of 750 to 1,000 board feet per charge. A smaller published design using a different formula holds around 450 board feet on a smaller footprint. Size the kiln to how much lumber you produce between charges rather than building bigger than you need.
Is it safe to build my own dehumidification kiln?
It can be, but only with real attention to the electrical side: dedicated, correctly rated circuits, no bypassing the dehumidifier's thermal overload protection, proper clearance around any heater, and a smoke alarm near the kiln itself. Most fire risk reported with homemade dehumidification kilns traces back to a unit running unattended past its design limits, not the basic concept of the build.