
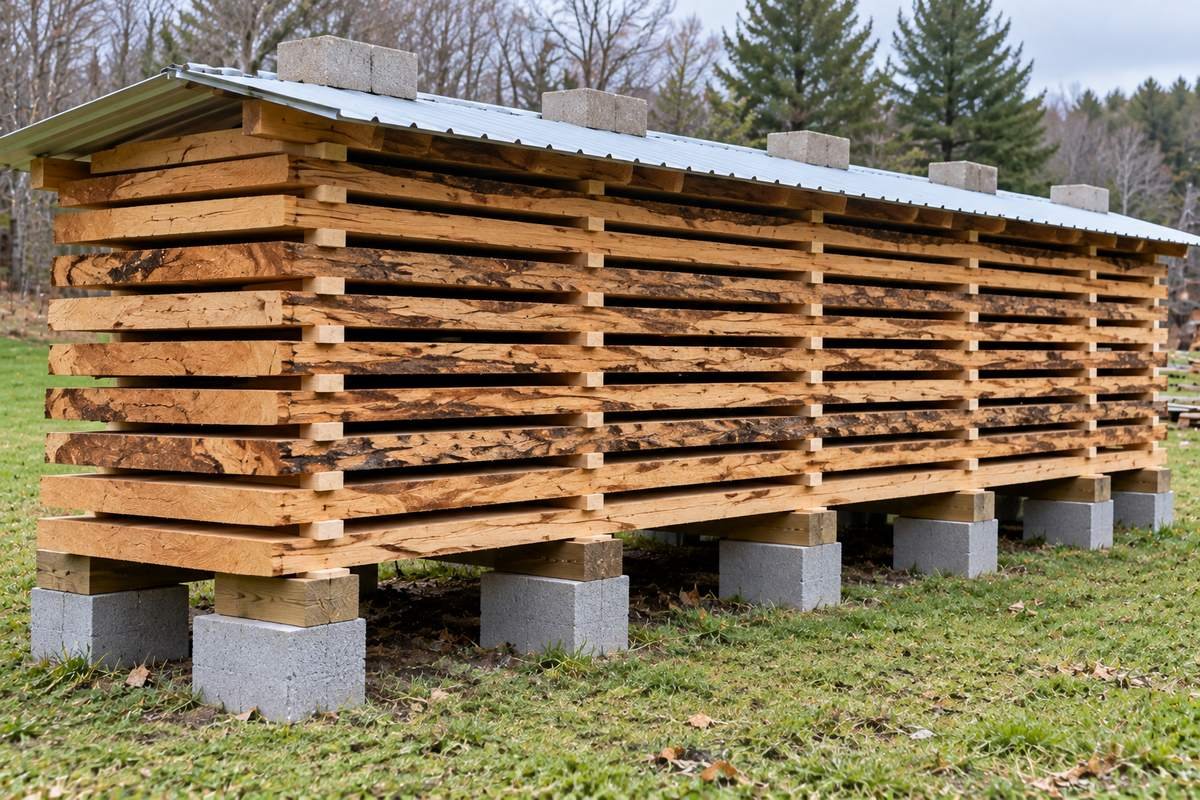
Air drying lumber means stacking freshly cut boards with spacers between them and letting outdoor air slowly pull the moisture out, instead of forcing it out with heat. It works, and it's free, but it only gets you partway there: air-dried lumber levels off wherever the local air happens to sit, usually somewhere between 12 and 20 percent moisture content, not the 6 to 8 percent you need for furniture or flooring. If you just milled a log and want boards that don't warp, crack, or rot while they dry, the stacking and sealing details below matter more than the waiting.
How Long It Takes
The old sawyer's rule of thumb is one year per inch of thickness for hardwood, and it's a decent starting point, but it hides a lot of variation. Species matters more than most people expect, and so does thickness:
| Wood | Thickness | Approx. air-dry time |
|---|---|---|
| Sugar pine (softwood) | 1 inch | 15 to 90 days |
| Red oak (hardwood) | 1 inch | 70 to 200 days |
| Most hardwoods | 1 inch per year | Rough rule of thumb |
| Most hardwoods | 2 inches | 3 to 4x the 1-inch time, not just double |
Drying time grows faster than thickness does. The water in the middle of a two-inch board has twice as far to travel as in a one-inch board, and the path gets harder as the surrounding wood shrinks and tightens while it dries.
Climate changes the math too. A board drying in a covered, well-ventilated stack in a dry western climate can reach 8 to 10 percent moisture content. The same setup in a humid eastern climate might stall at 12 to 14 percent and never get lower, no matter how long it sits, because the wood is in equilibrium with the surrounding air. That's the ceiling air-drying runs into everywhere: wood settles at its local equilibrium moisture content (EMC), and EMC is set by the climate, not the pile.
Building the Stack So It Dries Evenly
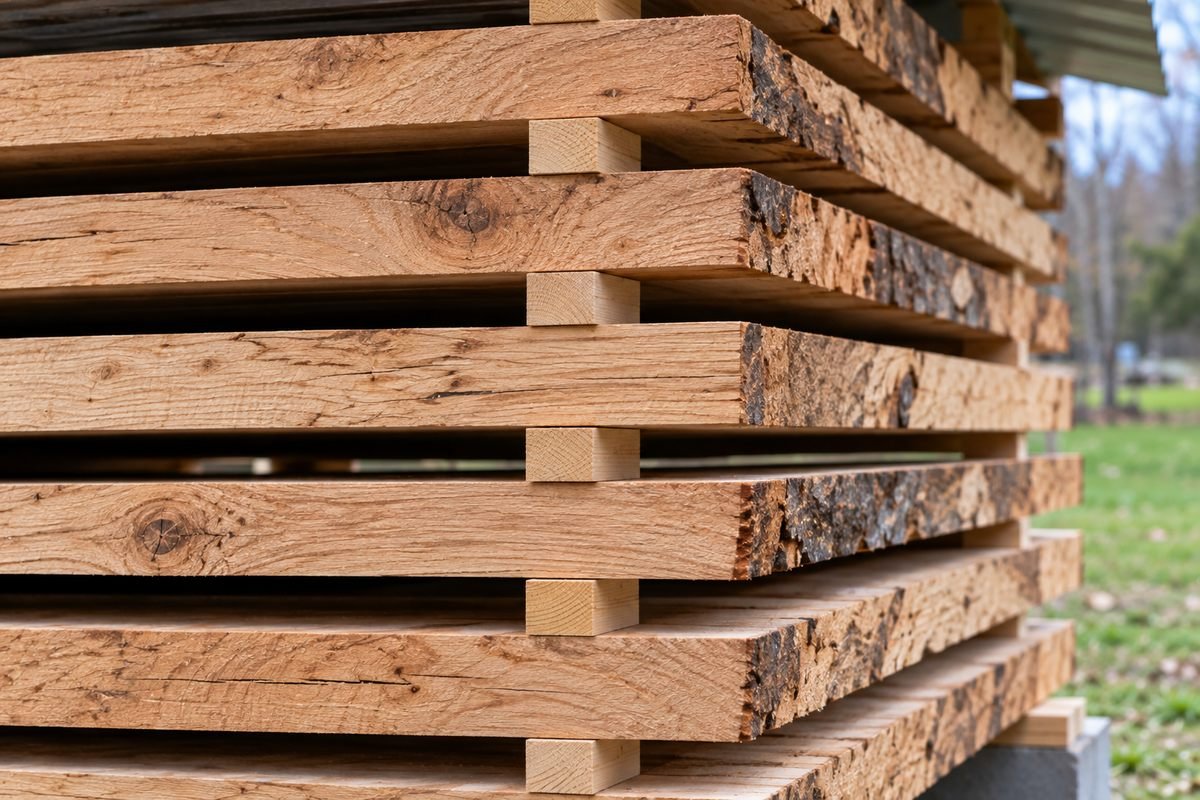
Most warped, cupped, or stained lumber isn't a drying problem. It's a stacking problem that shows up only after drying is done.
Get it off the ground. The stack needs a foundation, not just a couple of pallets tossed on dirt. Raise it high enough for air to move underneath, and keep the ground clear of grass and weeds that trap moisture. A taller foundation means more airflow underneath the bottom boards, which is usually the slowest-drying layer in the whole stack.
Use stickers of one uniform thickness. Stickers are the thin strips of wood, usually about an inch thick, that separate each layer of boards so air can move between them. If some stickers are thicker than others, the boards above them won't sit flat, and you'll get a permanent bow set into every board once it dries stiff. Space them 12 to 24 inches apart along the board, with a sticker at each end. Skipping the end stickers is one of the most common mistakes: the ends dry fastest anyway, and without support, they're free to curl.
Dry your stickers before you use them. Wet stickers pressed against wet lumber for months will leave a dark stain exactly where they touched, called sticker stain, and it doesn't sand out easily. Kiln-dried or well-seasoned stickers cost nothing extra and solve this before it starts.
Orient the stack to catch the wind, not block it. Set rows of stacks so prevailing wind can blow directly under and through them, and keep the stack away from buildings, fences, or trees that would block that airflow. A stack tucked into a corner out of the wind dries slower and less evenly than one sitting in the open.
Seal the Ends Before They Crack
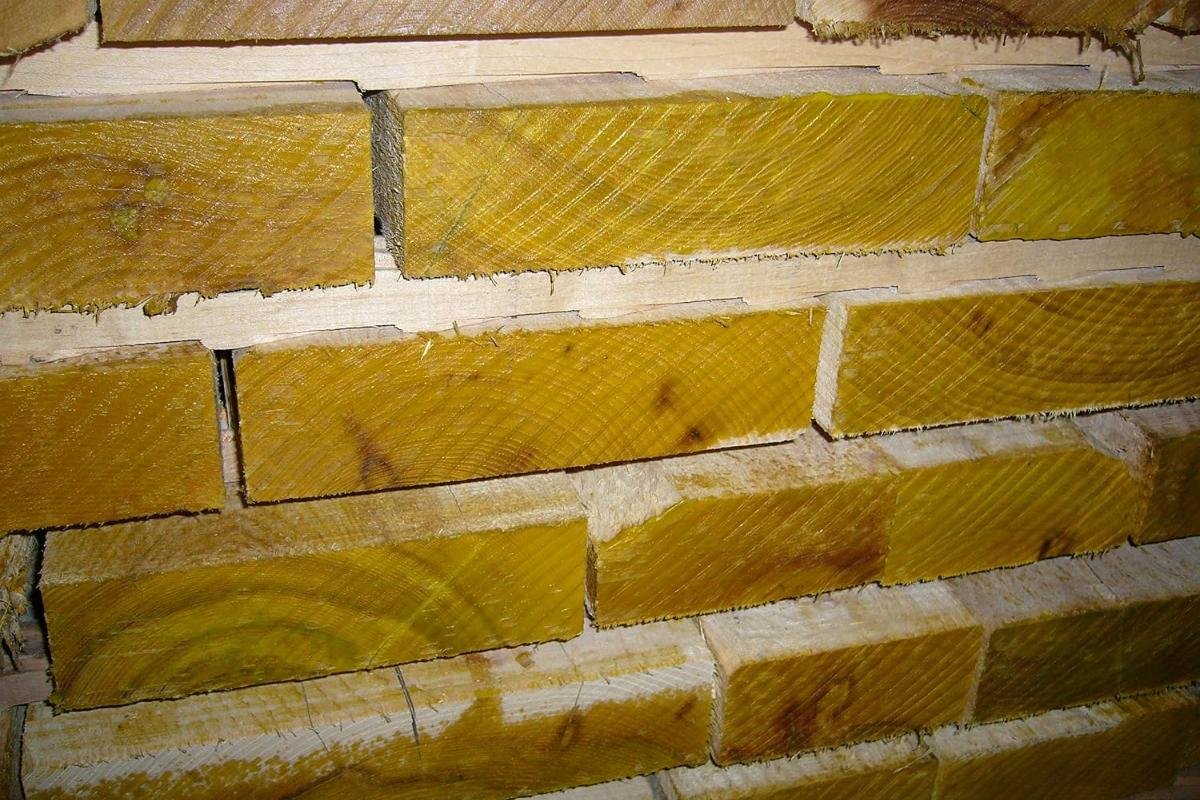
End checking is the most common defect in air-dried lumber, and it happens because the end grain loses moisture far faster than the flat faces of the board. Water travels easily out the open end grain, but water trapped in the middle of the board has to move sideways through the wood fibers, which is a much slower path. That drying-speed mismatch is what splits the ends.
The standard fix is an end sealer like Anchorseal 2 (rated 4.6 stars from over 2,400 buyers on Amazon), a wax emulsion brushed or sprayed onto the cut ends immediately after milling, before any checks have had a chance to start. It cuts end checking by roughly 90 percent, though it won't eliminate it completely on wide boards.
A cheaper alternative many sawyers use is a couple of coats of ordinary latex paint on the ends. It's not quite as effective as a purpose-made sealer, but it costs a fraction as much and works well enough for most projects that aren't premium figured wood. Either way, the timing matters more than the product: seal the ends the same day you mill, not a week later once checks have already opened up.
Weight the Top and Keep the Rain Off
The top layer of a stack dries the fastest and unevenly, since it's exposed to sun and wind on one side and the rest of the pile on the other, which is exactly the kind of uneven drying that causes warp. A simple roof made of scrap boards or roofing tin, angled to shed water, keeps rain off the stack without trapping moisture the way a tarp does. Add real weight on top. Cinder blocks work fine, and that weight holds the top layer flat while it dries instead of letting it cup or twist.
Skip the tarp if you can. It blocks airflow to the top of the stack almost as badly as covering it in plastic, and condensation underneath a tarp can do more damage than the rain it was meant to stop. A pyramid of scrap boards laid loosely across the top, wide side down, sheds water the same way a real roof would without costing anything beyond wood you probably already have lying around the mill.
How Dry Is Dry Enough
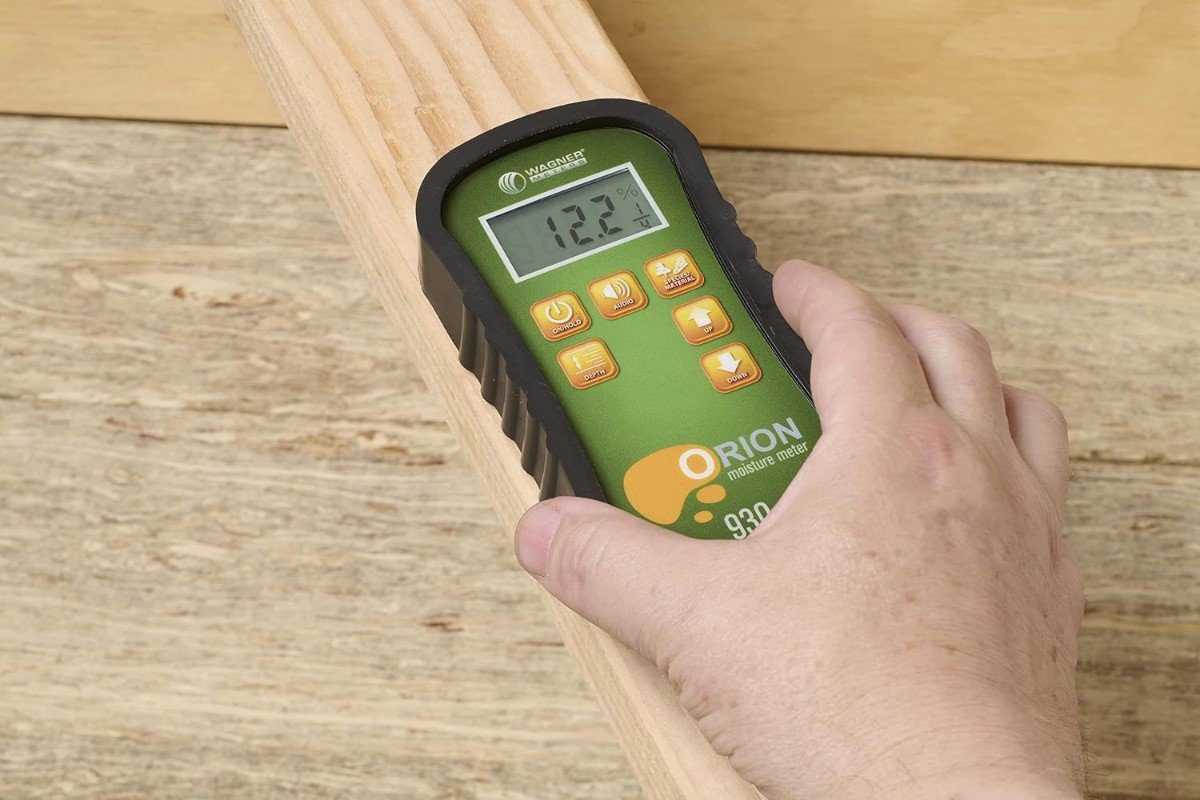
Air drying doesn't have a finish line you can predict by counting days. It has an equilibrium point, and the only way to know you've reached it is to check with a moisture meter rather than guess. Check a few boards from different spots in the stack, not just the top one, since the outer layers dry faster than the ones buried in the middle.
For most outdoor projects (fence posts, sheds, rough furniture), 15 to 20 percent moisture content is a reasonable stopping point. For anything that will live indoors (furniture, flooring, cabinetry), you need to get closer to whatever the wood will settle at once it's inside a heated or air-conditioned house, which is usually in the 6 to 9 percent range depending on your climate. Air drying alone often can't get you there. That's not a failure of the process. It's the physical limit of outdoor air, which is why kiln drying exists as a separate step after air drying, not a replacement for it.
Air Drying Lumber vs. Kiln Drying: Which One You Need
These aren't competing methods. For most sawyers, air drying is step one and kiln drying, if it happens at all, is step two.
| Air drying | Kiln drying | |
|---|---|---|
| Cost | Free (just time and stickers) | Requires a kiln, rented or built |
| Time | Weeks to over a year | Days to a few weeks |
| Lowest achievable moisture content | Local EMC, usually 8 to 20 percent | 6 to 8 percent, controllable |
| Best for | Outdoor builds, rough lumber, a first pass before kiln drying | Furniture, flooring, cabinetry, anything going indoors |
| Risk if rushed | Warp, checking, sticker stain | Case hardening, honeycomb, collapse |
If you're building a shed, fence, or raised bed, air drying alone is usually enough. If the wood is headed indoors, air-dry it as far as your climate allows first (since that's the free part), then kiln-dry the rest of the way, since the last few percentage points are the hardest to remove either way.
Common Mistakes
Tarping the stack instead of building a real roof. It feels like it should help, but it traps humidity against the wood instead of letting it escape.
Using stickers of different thicknesses in the same stack. Even a small mismatch turns into a permanent bow once the board dries and stiffens in that shape.
Skipping the end seal, or applying it too late. Once a check starts at the end grain, no amount of sealer will close it. The sealer has to go on before the crack forms, not after.
Stacking thick and thin boards together. Mixed thicknesses in one stack mean the thin boards are already dry while the thick ones are still shedding moisture, and by the time you notice, the thin boards have usually already warped from sitting too long under uneven weight.
Stacking next to firewood or old scrap. Infested wood nearby is the usual source of powder post beetles in a drying stack. Keep firewood and offcuts well away, and see our guide to powder post beetles in lumber for the signs to watch for.
Assuming a calendar date means the wood is ready. The one-year-per-inch rule is a rough average across species and climates, not a schedule. Check moisture content directly instead of guessing.
Building the stack somewhere convenient instead of somewhere that dries well. A shady spot next to the mill is easier to walk to. But if it's boxed in by a fence or a building and never sees real wind, the wood inside that stack will still be wet months after an identical stack in the open has finished.
Summary
Air-drying lumber depends more on how you stack it than on how long you wait. Get the foundation height, sticker spacing, end sealing, and top weight right, and the wood will dry about as fast and as flat as your climate allows. Skip any one of those steps, and you'll spend the same year waiting, just for lumber that's cupped, checked, or stained instead of usable.
Frequently Asked Questions
How long does it take for lumber to air dry?
The rough rule is one year per inch of thickness for hardwood, but it varies by species and climate. One-inch softwood can be ready in as little as 15 to 90 days, while one-inch hardwood like red oak can take 70 to 200 days. Two-inch stock takes three to four times as long as one-inch stock of the same species.
Can you air dry lumber indoors?
You can, in a garage or shed with good airflow, and it's often more consistent than outdoors since it's protected from rain and direct sun. Just make sure there's real ventilation: a closed-up space with no air movement will dry unevenly and can encourage mold on the still-wet interior of thicker boards.
Do you need to seal the ends of lumber before it dries?
Yes, if you want to avoid end checking. Sealing with a wax-based end sealer or a couple of coats of latex paint, applied the same day you mill the lumber, cuts end checking dramatically. It slows moisture loss at the end grain to roughly match the rate through the rest of the board.
What moisture content should lumber be before you build with it?
For outdoor projects, 15 to 20 percent is usually fine. For furniture, flooring, or anything that will live indoors, you want the wood closer to 6 to 9 percent, which typically means air-drying first and then finishing the job in a kiln, since most climates can't air-dry wood that low on their own.
Can you speed up air drying?
Somewhat. Raising the stack's foundation, orienting it into the wind, and drying it under a fan-ventilated or heated shed instead of fully outdoors can cut the timeline substantially. In one documented case, drying time dropped from over four months to about a month for the same species. You can't force it much faster than the wood's own moisture gradient allows without risking checks and warp, which is why a slower kiln schedule exists for wood that needs to dry fast and still stay usable.